
There’s no need to spend hundreds of dollars to get the polishing done at a detailing shop.
You can easily achieve a glass-like shine and rejuvenate your faded paintwork that has swirl marks and scratches.
I will teach you everything you need to know about car polishing and take you through all the steps you need to follow, so you know exactly how to polish your car to achieve a mirror-like shine.
Moreover, I will elaborate on some key differences in paint restoration processes and guide you on how to decide which process is best suited for your car’s paint.
If you want to learn more about why paint gets damaged and how to avoid it, you can refer to this article that talks about What are the Different Stages of Paint Deterioration, their causes, and prevention.
Polishing is one of the steps in paint correction, however, it can be done without prior compounding or wet sanding, which means, you can do this without a hitch on your vehicle’s paint.
The Overview of the Polishing Process
Wash & Dry —> Decontaminate —> Wash & dry —> Compound on, Compound off —> Polish on, Polish off —> IPA solution treatment —> Wash & Dry —> Final Top Coat of your choice.
Polishing a Car: What Does It Do and of What Importance Is It?
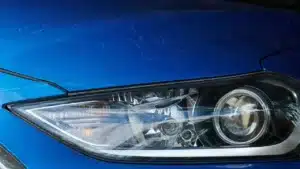
Polish is a very fine-cutting formula, it would level the clear coat just enough so that the light swirls and scratches are no longer visible.
It gives you the following benefits:
- Smooth Surface
- Deep color
- Shine like a new car
- Resale value
- Removes paint defects
It is also a vital step in paint restoration that helps remove the compounding (high-cutting formula) haze.
If you’d like to learn more about paint restoration, you can refer to our detailed article on How To Restore Car Paint By Hand In 5 Steps
Whether or not the paint restoration includes the wet sanding and/or the compounding step, you’d still have to polish it in the end — followed by a paint sealant or a coat of wax.
Once you have all the treatments in place followed by polishing, your paint job will be well protected against weather damage and harmful UV rays.
Useful Tip
Polishing a black car will give you even greater results — not only will the color get deeper, but you will also get that mirror-like finish.
If you want to learn more about the final wax treatment for your black car, you can refer to this article The Best Wax For Black Cars | 5 Waxes Tested And Reviewed.
How to Polish Your Car Like a Pro
Starting with the polishing process means that your paint/clear coat is relatively in good shape, and you don’t require extensive paint restoration.
However, if you feel that some panels are more damaged and the polish is not cutting as deep to remove the scratches and imperfections, you can use compound with a separate applicator pad.
In this section, I will guide you through all the steps that are involved in polishing your vehicle and will give you details on how you can use the compound in some areas to achieve the best results.

Materials Required
- Car Shampoo
- Microfiber cloth
- Washing mitt
- Detailing brushes
- Detailing masking tape
- Clay bar for decontamination
- One step polish
- One-step compound (optional)
- Applicator cutting pads
- Sponge Applicator
- Decon Spray, Alternative
- Ceramic coating (optional but highly recommended)
- Sealant and wax
- Sealant
- Pressure washer (optional)
- Dual action polisher or an orbital polisher (optional but highly recommended)
- A paint depth measurement gauge (for the weekend warriors)
Useful Tips
I highly recommend getting a pressure washer and a machine polisher. The ones I have linked here are ranked by taking each and everything into consideration.
However, if you’d like to learn more about pressure washers and polishing machines, you can refer to these detailed articles The 6 Best Electric Pressure Washers For Cars and The 6 Best Dual Action Polishers For Beginners And Professionals.
Step 1: Prepping the Vehicle
The first step is the prep work. It is important that you have a nice and clean surface before you start your polishing.
- Wash the car thoroughly and use the detailing brush to get the dirt out of those crevices along the body panels and plastic trim pieces.
- Use a plush microfiber cloth to dry the whole car.
- Mask those badges and emblems that can be damaged while polishing
If you have any dirt left on the surface and you start to apply polish, the dirt will cause scratches when you are applying the polish in circular motions.
Step 2: Claying (Decontamination)
- Get a light or medium clay bar (depending on the amount of contamination present on the surface of your paint job.
- Flatten the clay bar with your palm so it covers more surface area
- Get some soapy water or an iron decon spray bottle and spray the liquid onto the body panels where you want to clay.
- Make sure that you don’t wipe the clay bar dry onto the body panels
- The clay bar is wiped in straight lines. You can apply constant pressure (light to medium) depending on the paint condition.
- If the clay bar feels that it is fully covered in dirt and grime, fold it inwards and flatten it again to reveal a fresh dirt-free surface.
- Keep on wiping with light to medium pressure until you feel that the clay bar just glides on the surface without feeling rough on the panel.
- Do this process for the whole exterior.
- Wash your car and dry it.
Step 3: Polishing
Before you polish your car, park it under a shaded area away from direct sunlight.
Polishing Your Car Using Hand Polishing Method — The Polishing Pad

- Prime your applicator pad (softer pad) by putting a couple of dots of polish over the pad and spreading it out evenly on the whole pad — not too much polish.
- Once the pad is primed, put on the polish over the pad. You can put six to seven dots or simply smear it in a circular pattern.
- If you are applying by hand, you can apply the polish with constant pressure in circular motions.
- Make sure you work in portions — one body panel at a time.
- Once the polish is agitated over the surface, wipe it down with a clean microfiber towel.
- Repeat this process to cover all the panels.
- If you feel that the polishing pad is getting filled with polish residue, you can either take the surplus polish out with a soft bristle brush or you can simply replace the polishing pads altogether.
- Prime the new dry pad and you will be good to go
- And that is how to polish your car manually without any tools with just softer pads and some elbow grease.
Polishing Your Car With a Machine Polisher and Polishing Wheel

- Prime the polishing pad.
- Put on six to seven dots of polish or smear the polish in a circle on top of the polishing pad.
- Apply the polish onto the surface without turning on the machine polisher.
- Once you have smeared the polish across the panel you are working on, turn on the polishing machine at the slowest setting and start applying the polish with steady pressure.
- Move-in horizontal lines overlapping each other, and then vertical lines overlapping each other.
- Increase the speed to four or five and move slowly in the same pattern.
- After 3 sets of passes, wipe down the polish residue with a clean microfiber cloth.
- Make sure to have extra polishing pads, in case one of them falls on the ground. Once a pad falls on the ground, it’s over. It will collect dust, which can scratch the vehicle’s surface.
Finishing
Before moving on to the next step, it’s best to clean any remnants of car polishing that are still on the panel using an IPA solution and rub down the entire vehicle.
Not all polishes come off the same — some require more effort than others.
Similarly, not all polishes give good results, so make sure you get some good quality products.
Step 4: Applying Sealant
After finishing the polish and IPA solution treatment, it’s time to ensure that the results from this long and laborious task can be maintained for an extended period of time.
This is why we will put a top coating over polish that can seal all of that work and keep the shiny finish for much longer.
- Pour a couple of drops of paint sealant on the microfiber sponge.
- Make sure not to apply too much sealant — a thin layer on the car is more than enough.
- You can either apply the sealant in circular motion or in straight lines, both are acceptable.
- Let the sealant sit on the surface, once dried, you can wipe it off/buff out the dried-up mess with a clean microfiber cloth.
Before you move on to this step, ensure that the entire vehicle is free of contaminants or other paint defects that can be corrected. Any imperfection on the paint would get sealed in with the coat.
Those imperfections would appear as high spots on the paint’s surface.
Therefore, it’s necessary to start with a super clean surface.
Common Mistakes to Avoid When Polishing Your Car
- You got the multiple-step polishing kit and now it takes forever to get all the steps done. It’s best to get the single-step polish and/or compound to keep things simple.
- If there is any dirt left on the body panels, polishing compounds can cause more scratches.
- Without decontamination with a clay bar, the paint surface will not be welcoming enough for the polishing compounds.
- The ceramic coat also needs a super fine surface without any contaminants to bond properly.
- Do not go for wet sanding if you haven’t done compounding or polishing before. And make sure wet sanding is carried out under supervision from a professional or a detailing enthusiast.
- Don’t forget to prime the polishing wheel before applying the polishing compound to the panels.
- When using a dual action polisher or the orbital polisher for applying the polishing compound, start with the lowest speed setting and give it a couple of passes vertically and horizontally overlapping each pass.
- After a couple of initial passes of the polishing compound, you can increase the speed of the polishing wheel.
- If hand polishing is not showing results, you can increase the amount of polish.
- For machine polishing, you can increase the speed while keeping hand movement slow, before resorting to a lower-grit polishing compound.
Useful Tips and Information to Remember
It’s best to have the single-step polishing product instead of those multiple-grit polishing compound kits that would require you to apply in a sequence going from lower grit (high cutting) to higher grit polish (light cutting).
The highest grit cutting is generally your polish, while the lower grit that is highly abrasive is usually referred to as the compound. You can use compound before polishing, to get better results.
However, I would recommend you stick with the two aforementioned cutting steps — single-step Compound & single-step Polish
If you go for a three or four-step cutting process without proper equipment, it would take a you whole day, maybe more, to get to the final waxing and sealant application on your entire car.
If your paint is super rough and damaged, you can apply the compound more than once without a problem.
Applying the compound twice is better than doing wet sanding, in the case where you are not familiar with how it works.
Generally, wet sanding gives better results if you are an experienced detailer — given the fact that your paint is thick enough to handle the wet sanding.
Differences between Waxing and Polishing

Polishing
Polishing is the step in paint restoration that comes after compounding. It removes haze left over after compounding and increases color depth and overall shine. Its formula is much less abrasive having high grit that skims the top of the clear coat just enough to remove the light scratches and swirl marks.
Wax
Wax is not an abrasive formula and it does not cut the clear coat in any way, it only makes a barrier (provides protection) against environmental harm and rejuvenates the lightly faded paint color. It can not remove scratches, instead, it masks the light scratches up to some extent.
Wax is the last step in paint restoration that can be done either after a ceramic coat or after a sealant coat. It can also be applied right after polishing, but it’s recommended to apply a long-lasting coat over the polish to keep the paint protected.
FAQ
Can I polish my Car myself?
Yes, you can polish your car yourself and achieve a close-to-pro-level finish if done properly. I have explained all the steps of hand polishing your car to achieve a mirror-like finish. You can follow the step-by-step procedure and achieve great results.
Although dual action polisher can make the job much easier, you can still carry out the polishing by hand if you don’t have a dual-action polisher or an orbital one.
How often should I polish my car?
A polishing procedure is recommended every six months. The time interval can vary depending on the driving habits, and the weather/climate where you drive your car.
It’s best to couple polishing with compounding and top it off with a good wax and sealant. Proper treatment can last up to a year with regular waxing.
Is it possible to polish a car by hand?
Yes, it is definitely possible to polish a car by hand. If you don’t have a dual-action polisher, you can get about the same results polishing your car by hand — though you would have to put in extra time and effort.
Can car polish remove swirl marks and scratches?
A car polish can remove light swirl marks and scratches. However, it won’t remove the deeper scratches. The best it can do is to mask those scratches so it won’t pop as much, and would be concealed.
If you apply the compound before polishing on the same spot, you can get better results.
How long does it take to polish a car?
Polishing can take around 8-10 hours if you are doing it manually without tools for the first time. These 8-10 hours would include prep (traditional car wash, decontamination, polish, IPA treatment + car wash & drying, and wax/sealant application.
If you have a dual-action action polisher and a pressure washer, 6-7 hours is all you need to finish the whole car.
Conclusion
Clear coats on the whole car eventually thin out because of excessive wet sanding and ever so often compounding — yes, it’s a messy process, which is why it’s important to do it right and avoid the need to do it again.
The polishing process doesn’t require a million bucks. After reading this comprehensive guide, you know exactly how to polish your car to achieve a mirror-like shine and get rid of all the paint imperfections on your car at a fraction of the cost.
Park your car under a shaded area, away from direct sunlight, then wash your car and get rid of the tree sap, bird droppings, and other debris — anything you can see with the naked eye.
Follow all the steps, tips, and precautions I have given on polishing your car, especially the step where you wash and decontaminate the surface before compounding/polishing and the clearing away of residue after polishing.